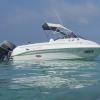
tuffy Posted October 22, 2008 Share Posted October 22, 2008 (edited) Fellow Raiders, knowing how you all just love watching someone else's reno, here is the latest!! One of the young blokes from work bought Vickers 5.1 fibreglass runabout about 6 mths ago and he's now decided to let ME do the reno for him. ( under persuasion, of course). First we decided to cut the floor to enable the fitting of under floor fuel, so the floor was cut out and will be soon ready for re-glassing the soon to be made compartments, one for fuel and one for storage /kill tank. Circular hole at the front is where I did initial underfloor inspection. We also intend to fill entire under floor with liquid expanding foam to enhance flotation. At the same time we decided to strip the boat and paint the outside. I did this at this stage because we had a small window of opportunity to use a workshop for the painting - one weekend only, so it had to be done then and there. What you see is the final topcoat of marine gloss with part of the inside of the hull done as well. The rest of the interior will be carpeted when interior work is complete. I will keep you posted with more pics as the re-fit continues. Watch this space---- Tuffy. Edited October 22, 2008 by Tuffy Link to comment Share on other sites More sharing options...
mr magoo Posted October 23, 2008 Share Posted October 23, 2008 looking good ,keep us posted love these type of post,maybe one day il have a crack at one cheers arman Link to comment Share on other sites More sharing options...
Flightmanager Posted October 23, 2008 Share Posted October 23, 2008 Keep us updated , shes lookin the goods already !! Ross Link to comment Share on other sites More sharing options...
pelican Posted October 23, 2008 Share Posted October 23, 2008 Good start on a good old boat. Hint - don't use liquid pour foam. Buy propper sheets of fuel proof foam that will never get waterlogged. Some liquid foams when that break down can go acid and give of chemicals. The better quality ones are just 2 expensive. Link to comment Share on other sites More sharing options...
tuffy Posted October 24, 2008 Author Share Posted October 24, 2008 (edited) Pel, I know what you're saying, but I can't get the sheet stuff into where I want it. The foam isn't going into the cutout section, it's going in the cavity under the floor between the new cutout and the outside of the hull, so I'm going to have to drill some holes into which tp pour the liquid and then reseal them with glass. Besides, I'm just doing the work, the owner is paying for the materials and he wants the good stuff, so hopefully no future probs. I'll post pics as I go - that's when I get RDO's to do it!!!!! Cheers, Tuffy. BTW, any Raiders know where I can buy this stuff - liquid foam?? Edited October 24, 2008 by Tuffy Link to comment Share on other sites More sharing options...
pelican Posted October 24, 2008 Share Posted October 24, 2008 (edited) Will send a PM In an older boat just do a quick calc and work out how much floatation the cavity could honestly provide compared to the hassle and risk. If it is a sealed place anyway it will hold air? Foam will always in some way restrict draining if it is an area that drains to the bilge. To be honest with most they will go down like a stone except for air held in the cabin nose area and often that is not near enough. Foam can be a problem and not add a lot of benefit unless it is thought through. Best case in lab conditions a cubic foot of a nominal two pound density Polyurethane Foam will support approximately sixty ( 60 ) pounds of dead weight in water.. (1m3 will float 3/4 to 1 tonne) Foam wieght about 25kg / m3 Edited October 24, 2008 by pelican Link to comment Share on other sites More sharing options...
tuffy Posted November 22, 2008 Author Share Posted November 22, 2008 Ok, people, after a long time and limited RDO's, we are finally making some progress on the old girl. Have done a lot of work but that is not so evident by the pics, but trust me, any of you guys that have re-worked fibreglass know how bloody time consuming it is - and certainly not pleasant grinding out old glass. So, we have now finished the fuel box and kill tank ( pics added ) and we will now move on to making new seat boxes, painting the balance of inside, carpeting and re-fitting. We have also strengthened the dash as it was cracked and wobbly. We glassed a piece of ply behind the existing dash and filled and sanded - strong as, now. Note, new hatch under transom is for access to bilge. Aluminium square tube is to run the fuel and breather lines from the tank box to the stern - also acts as a support for the rear kill tank lid ( yet to be fabricated). lots of man hours in doing just this part with what seems like little result, but the back of the hard work is now broken. More pics. Cheers Russ Link to comment Share on other sites More sharing options...
harrold101 Posted November 22, 2008 Share Posted November 22, 2008 nice work mate ive done the same thing with my old cruise craft: relayed fibreglass floor and your right it is very time comsuming and annoying to work with.. (its taken us 3 years to do what we have ) what else are you going to do to yours? Link to comment Share on other sites More sharing options...
glennmreid Posted November 23, 2008 Share Posted November 23, 2008 love the pictures. keep us updated. Link to comment Share on other sites More sharing options...
tuffy Posted November 23, 2008 Author Share Posted November 23, 2008 nice work mate ive done the same thing with my old cruise craft: relayed fibreglass floor and your right it is very time comsuming and annoying to work with.. (its taken us 3 years to do what we have ) what else are you going to do to yours? Sammy, I've cut out the bottom of the side pockets to allow your foot to go underneath for fighting fish ( or taking a leak over the side). I am going to put new bottoms in the side pockets, so they will be shallower but still usable. The next step next Wednesday ( RDO) is to make the lids for the fuel box & kill tank, make the bases for the new seats which will be glassed in,and also do the side pockets. After this it will be finishing off the paint inside, replace new gunwhale rubber, new carpeting and wiring and refit all the chandlery ready for the Basin at Xmas. Most of the time consuming work has now been done and the rest is just fiddly stuff. Good part is the the noisy power tool stuff is done , so we can work on the boat in the evening now without pissing off the neighbours. Putney is a very quiet suburb!! I'll continue posting pics as I go. Thanks everybody for your interest. Cheers, Russ. Link to comment Share on other sites More sharing options...
robeebee Posted November 23, 2008 Share Posted November 23, 2008 looking great mate Link to comment Share on other sites More sharing options...
sportfish Posted November 23, 2008 Share Posted November 23, 2008 Great work good to watch the progress from here Link to comment Share on other sites More sharing options...
tuffy Posted December 17, 2008 Author Share Posted December 17, 2008 Ok Raiders, we are almost finished this project. Carpet now in as well as lids and seats /gunwhale rubber etc. Just a little more wiring of 2 bilge pumps and tidying up and we are there Link to comment Share on other sites More sharing options...
tuffy Posted December 17, 2008 Author Share Posted December 17, 2008 more pics. The old girl will be totally finished this weekend, thank God. Cheers, Tuffy Link to comment Share on other sites More sharing options...
glennmreid Posted December 18, 2008 Share Posted December 18, 2008 Looking good Tuffy. I bet you can't wait to take her out on the water Link to comment Share on other sites More sharing options...
jahajo Posted December 18, 2008 Share Posted December 18, 2008 Nice boat mate What engine are you thinking of putting on her? Link to comment Share on other sites More sharing options...
tuffy Posted December 18, 2008 Author Share Posted December 18, 2008 Nice boat mate What engine are you thinking of putting on her? Mate, it's already got a 2004 Yammie 115 on the back . Goes well. Tuffy Link to comment Share on other sites More sharing options...
robeebee Posted December 21, 2008 Share Posted December 21, 2008 looking great again Link to comment Share on other sites More sharing options...
moover Posted December 31, 2008 Share Posted December 31, 2008 Tuffy what paint did you use on her?? Link to comment Share on other sites More sharing options...
tuffy Posted January 12, 2009 Author Share Posted January 12, 2009 Tuffy what paint did you use on her?? Moover, we used Northane single pack marine enamel over Norust marine primer - aussie made & local. Good stuff. Sorry about the delay in reply - just got back from hols at the Basin. Cheers, Russ. Link to comment Share on other sites More sharing options...

Recommended Posts
Create an account or sign in to comment
You need to be a member in order to leave a comment
Create an account
Sign up for a new account in our community. It's easy!
Register a new accountSign in
Already have an account? Sign in here.
Sign In Now