Mik
-
Posts
725 -
Joined
-
Last visited
Content Type
Profiles
Forums
Gallery
Events
Fishing Tips, Advice and Articles
Blogs
Store
Everything posted by Mik
-
Hey mate, do they look anything like the ones in these photos? Step By Step Trailer Brakes & Bearings - Part 1 of 3 Look down the bottom of that page to see the caps.
-
Nice pics as usual Ray. Great fishing with your sons, best time in the world. By the way, 'scuse my ignorance but what is a horsie, are they the Bonnies or did he also pull in other fish? I would normally call a large yakka or slimey a horse but........?
-
Great to see a trip pay some dividends for you, especially hooking another angler to the ranks. Its great to see people getting excited about fishing. Well done.
-
 Thanks guys for the comments. Yes I have to say it was a huge thrill to see my boys get into the fish, especially the fabulous Mulloway. They keep coming in & asking to see the photos so I guess I better print them off before my internet bill skyrockets
 -
Yeah, those sails are great, my favorites I think but I have to say I am a little surprised that there are not more shark pics there. He has 100's of 1000's of photos from his travels all over the world. One set he showed me a few years ago when we were in Ireland for a wedding were of a trip he did off Florida, Tiger sharks EVERYWHERE! He told me it was a well organised trip which had been run over many years, the guys that run it are all for the photographers getting quality pics, so if the sharks don't play ball & come in close enough one of the guides sneaks in behind you & dumps a milk crate of burley over your head.....sharks swarm in & if the photographer hasn't dumped his own burley trail he will get some amazing close ups!!! Bugger that!
-
I'm very proud to be able to present to you all my Brother In Laws underwater photography website. Nigel Motyer Sharks are his thing but there are some fantastic photos of all sorts on here. This isn't a plug as he doesn't actually sell anything, its just me showing off my brother in laws skills, as I said, we're very proud of his work.
-
Hey guys, thanks for the comments. Yes it was a great trip & all the better for having met Byron. There are not too many people who would spend the time he did when I first arrived on Friday talking on the phone at well past midnight to help try & get me onto some fish. I was keen to get out there & Byron offered to "Fish" with me on the phone, it was brilliant as he was able to place me in a prime spot. Unfortunatley I ran out of bait & the fish were not all that cooperative the first night. To give you an example of Byrons fishing knowledge (Or superb hearing!) I did get one big hit which pulled some serious drag from my Spheros 8000, I was on speakerphone to Byron at the time it hit & after I settled down & confirmed the fish was gone Byron says to me, "Nice reel Mik, is that a Shimano? I can hear its sweet sound from here!" I had a great time with the family & some friends from Friday to Monday. Unfortunatley our friends didn't see any quality fish except for one ripper Bream we caught in the crab pot on Saturday. We also lost that pot due to a mix up when setting it, neither of us were watching what the rope was doing when he asked me to back up a little so he could tie the float, the prop grabbed the rope, ripped it from his hands & left the float in the boat. He was VERY lucky not to lose a finger or three. Anyway, the prop was fine, the pot recovered several hours later at a lower slack tide when the rope wasn't held under by the current, nice effort considering it held the Bream & 2 crabs, one which was a stonker legal. As a side note the rope had also ripped the transducer from its bracket & broken one of two plasctic clips that hold it in place. It worked for the rest of the week with the occassional need to push it back into place. I should have fixed it properly when it happened because on the last day I discovered I had lost my transducer all together! My mate did get one BIG hit when he first of all pulled in an eel & there was a squid following, I got him to hold the eel in the water for a minute while I quickly rigged a jig & threw it in......BANG!, one fresh live squidly thank you very much. We sent that out straight away & it was only a matter of a few minutes when the rod really buckled over. Being a fly fisho he wasn't used to something wanting to rip him from the boat so I think he may have struck a little early.....unlike Byron who rolls ciggies whilst a fish plays with his baits..... the fish was gone as quick as it came but I know my mates heart was racing for awhile after. Byron had given me some tips for the rail bridge & on Monday arvo I set out with the wife & billy lids to see what we could do with a quick arvo tide change. I set my Jew rigs out with a livey & some fresh squid & then setup the boys on two light rods with 6Lbs line & 12Lbs paternoster rigs (Thinking they might get a by-catch for some fun, when your 3 & 6 any fish is fun) Well, not only did the boys pull in some eels that were alot of fun, they managed to score a fine soapy each. Now I'm not one to brag about my kids aimlessly, but with just a little help from me on the lift part, the boys each wound their own fish to the boat & my eldest (6 years) even played the fish to the boat so I could net it. They were both legal & Dad scored a donut, just goes to show you that all the right setups don't always score for the table! So, Lil' Boof & Mini Boof are one up on Dad for the Jewfish as I'm yet to actually get one in the net. The day I took Byron out was a real treat, listening to the knowledge he has was excellent. I certainly learnt a thing or two about the Hawkesbury & Big Jews. Thanks mate, it was a pleasure having you aboard. We had some brilliant fun with the Kingies whilst competing with them for the slimeys & yakkas. That's two seperate occassions I've had kigies on my bait jigs, only this time I managed to get one in the net (Undersized & released after a qucik snap above in Byrons post) They were certainly easier to skull drag to the boat on the heavy gear once I sent some smaller yakkas out for them. We still managed some liveys for awhile after the rats arrived which surprised me. But after about 1/2 hrs the rats really got stuck into the smaller fish & they all disapeared. Shame we didn't manage one of the bustoffs as I'm certain they would have been legal and possibly hoodlums. Anyway, the soapy I was rewarded with later on was worth the efforts & now I'm armed with Byrons tips on rigs etc & know it will give me a definative advantage next chance I get to do the Hawkesbury. My wife fell ill during the arvo & I had to cut our session short & rush back to Sydney. Looks like some sun stroke after an initial scare but she's fine now & all is well. Thanks again Byron (And also Steve who gave me the tips one bait grounds!) I have a great few days on a river that I previously felt was way too hard to fish or even barren of fish. With a little persistance, some great advice & an appetite for learning I now know there are pleanty of quality fish in that beautiful system & next time I will arrive armed with better skills & knowledge which may even result in a fishos dream of a big silver Mulloway. Oh, just for the info of other members, the water was not the cleanest most days, the barometre played havoc with the bite but all in all we managed some great fish, loads of crabs & some excellent memories. Here's some pics of the boys and their catches. Lil' Boof all smiles after out doing Dad Mini Boof was lucky to score not 30 seconds after I said we should get going back to the apartment.

-
That would be fantastic, not sure if my friend will be with us until Sat arvo but I'm well up for a fish solo alongside you or maybe even grab another Raider. Like I said, not sure what my mates movements are just yet, if I get there & he's not coming I should have time to post a quick message on here via my mobile, first in best dressed as they say. Hope it comes off mate, I'd love to finally meet the legend.
-
Mate you can get it back, the fish shouldn't be returned to the water anyway, so even if a little surgery is required you'll get an engulfed lure back. Just be humane & kill it first before surgery.
-
Thanks but I seriously can't see me bagging out ahead of you How are the tides & things looking for a Jew session one night? It looks like rain might be a factor but as I mentioned, its been a long time between serious fishing & will probably be a long time after, so I will need to be biblical to casue this lil black duck to stop fishing! I couldn't help myself today, bought two 4500 Shimano Baitrunners & loaded with 30Lb Bionic Braid. Was thinking a nice little yakka on one & a squid strip or fishy fillet on the other & see how I go. Can you give me an idea what would be the best day / night to try for a Jew? We'll be there Firday midday to Monday morning. (I can see it now, my wife doing her best school teachers impression..."Now young man, take that boat out of the water & go home, your holiday is over")
-
Thanks Steve, got the pill box on Google earth I think. Is it easy to see from water line?
-
Hey mate, this is what I did with a peice of ali angle. Just cut a vee out of it & bent to shape then rivets to hull, works a treat.
-
Hi everyone. Hoping to get some tips guys on where I might be able to get onto some kingys out of Hawkesbury. I have a good knowledge of Sydney Harbour but the Hawkesbury baffles me. We are travelling down Friday & going home Monday. I have invited a mate of mine to come with us & we will have kids in tow for alot of the weekend but I'm hoping he & I can get out alone at some stage. I was thinking of going to one of the reefs outside (Boultons, 9 mile Kilcare etc) the Hawksbury inlet but I have no real idea of which ones are worth the travel time. We are staying in Brooklyn & the boat will be on the water the entire weekend. As some of you know, the boat is more than capable of going where ever we want within reason & I was seriously thinking of heading to colours or similar from Brooklyn just because I know it & also I'm not as privelaged as alot of you lucky city buggers, my trips are limited in number throughout the year now so I'm more confident of at least finding a few fish there). It looks a fair hike on Google Earth, anyone ever done this at say around 20-25 knots (How long did it take?) Are there better Kingie options closer. I can have down riggers so depth aint an issue either (Unless you're talking Browns ) Also, whilst we are there and seeing as though my fishing oportunities in the last 18 months have been dismal & will probably go back to that after this trip I'd like to make the most of it, some night Jew sessions are not out of the question. Sorry, I know its a broad question but what are my best options beside drifting for flatties in the bays with the kiddies (Planning on doing some of that anyway) Any advice would be greatly appreciated. Oh yeah, where are the livies in the Hawkesbury?
-
I know that tuna can be bled effectivly by piercing a knife into them behind the pectoral fin & up a little. Here's the way commercial guys dispatch & bleed tuna. Bleeding I don't think most rec fishos would go this far. The one tuna I've been witness to catching was about 35kg & we spiked his brain & bled him at the prctoral area, he pumped blood well & then we chilled him. It was bloody beautiful.
-
Strewth, thats bizzare. That fella obviously had some bad karma owed to the fishing gods.
-
Nice Kingies there Steve Man you're not having much luck with the bombs! Whats the story with the sunken boat? I saw that a few weeks ago & thought it was very odd, it looks pretty new. It is mad how the Kingies play only when the want, I've seen them vanish within minutes & a score of boats all reporting nothing over a good sized area. Pretty frustrating.
-
I don't think the Rose Bay ramp has a fresh water tap anywhere. Well, there is one but its been out of action since I've been going there (2 1/2 years) Interestingly enough, I am currently inside the house to escape the heat from my shed, I'm plumbing up my deck wash (Salt water) with a Tee peice to allow suction from another point. The idea is to use the pump to flush my motor as I have a long drive back home from any saltwater launch. Also, it would be nice to have fresh water on tap to rinse my tackle too. If you have a deck wash let me know & I'll post up some picks of my modification, its been very easy to do but is as yet untested.
-
Thanks for the praise guys, hope it helps someone out. Better to take my mechanical advice (As plain as it is) than to listen to my fishing advice, you'd end up with zeros.
-
Class!!!!! Geeze mate if I knew school was involved I would have skipped it!
-
Happy birthday ya'll Hope its a good one. Slinky you're the best Dad EVER!
-
Ah good 'ol Fanta, she rests quietly under the house. The day one of my sons asks to take Pog out on his own is the day I say, "Mate, your boats under the house, get to work!"
-
Like I mentioned in the post, there are lots of methods for tensioning the bearings. As long as there is rotation by hand to some amount & nothing is making horrible grumbling noises you should be ok. The key is to check them regularly, Its pretty easy to do, jack her up & grab the wheel, if you can physically move the tyre from side to side & it feels loose then its time to add some tension to the nut again. If its grumbling then its probably time for a replacement of bearings. As for the grease, because we buy in bulk for work & that EP lipex is on hand its what I use, we did have the red grease but changed brands due to a change in supplier accounts. Either way I can't see any sense in spending a fortune on wheel bearing grease, it should be changed regularly anyway. As long as the old grease is removed then its all good. Some specalist greases react with each other & produce either heat or cause a breakdown of the greases rendering them useless as a lubrication. Mixing greneral purpose greases is generally not such an issue though, we're talking industrial and expensive types that start to get fussy on the mixing side of it.
-
Chris Yeah mate, I knew I'd leave out some items. I did use some inox, but only to try & clean the brake dust off my wheels. It was n't very effective on that. As for seized threads, inox & wd40 are both good, but the best product I have found for seized threads is Penetrene. We buy it in 2 litre containers! It seems to soak in better than anything else. Inox is still my #1 choice for cleaning & maintaining fishing gear though.
-
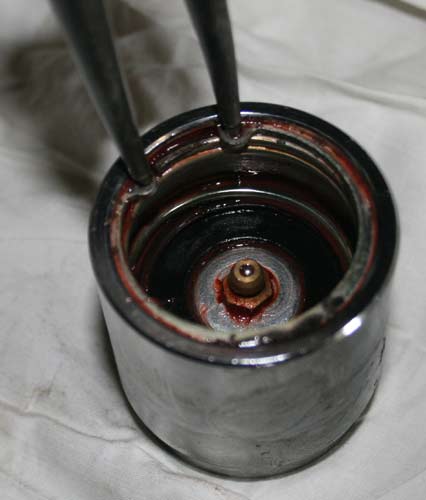
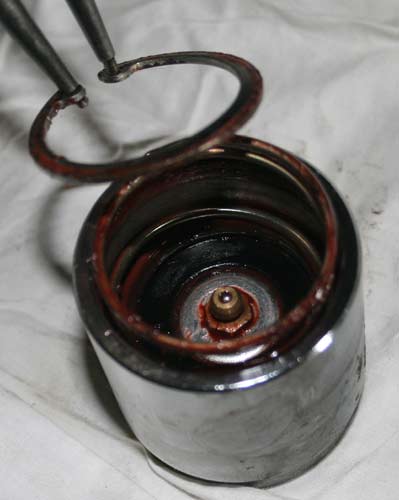
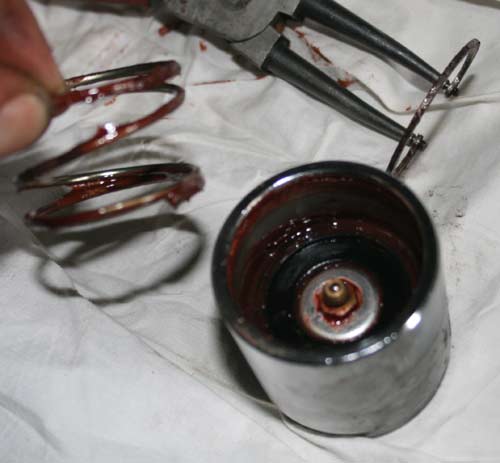
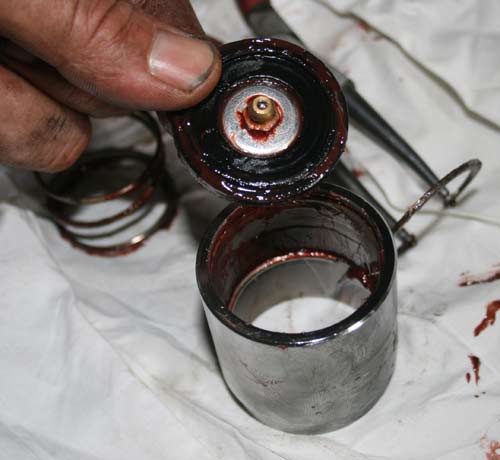
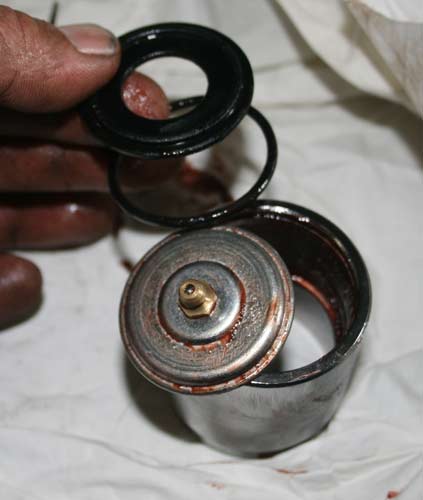
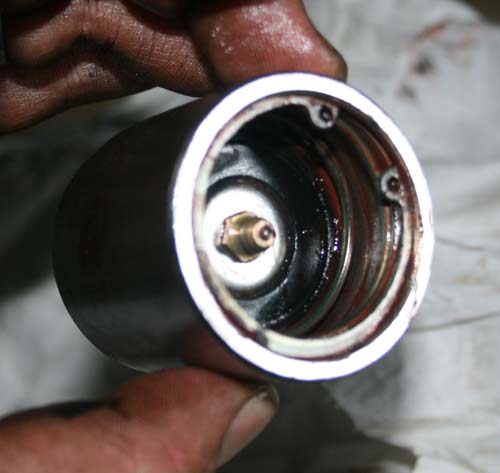
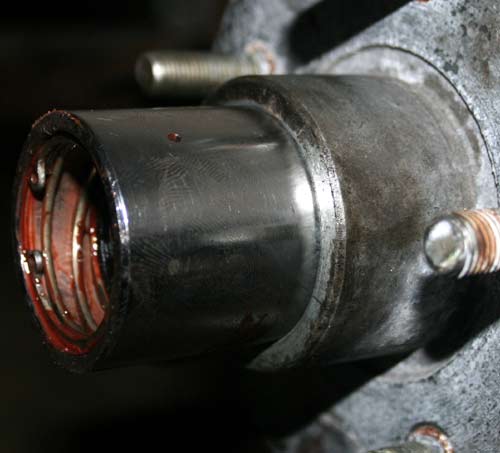
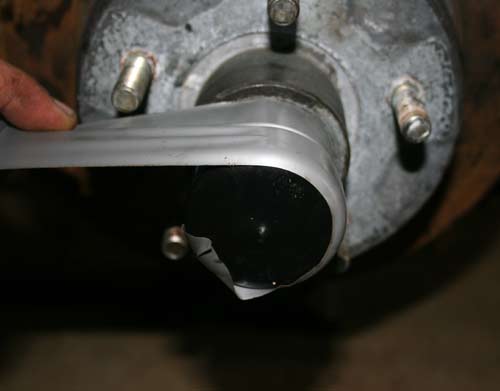
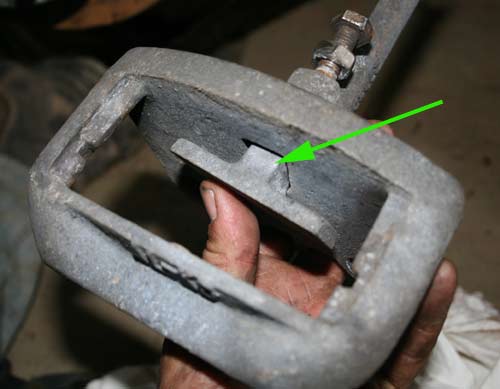
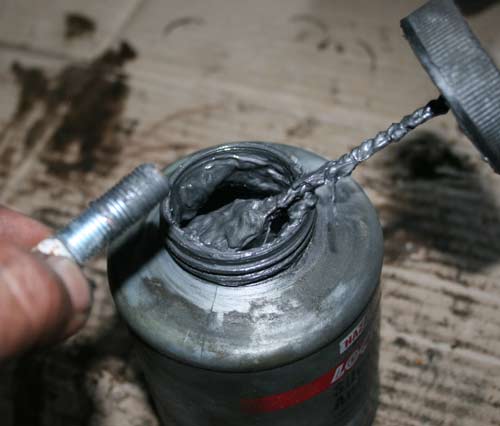
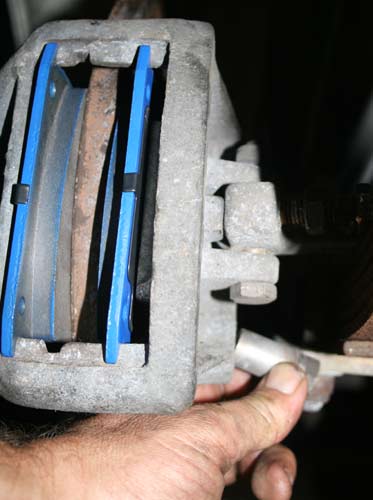
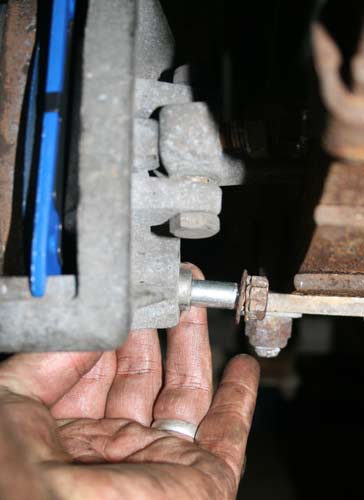
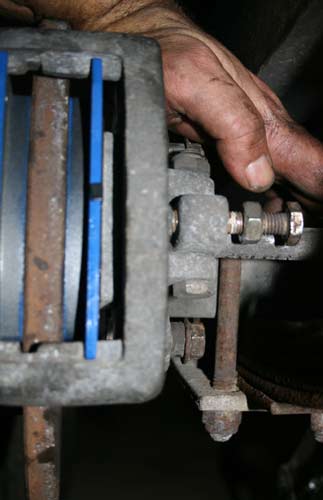
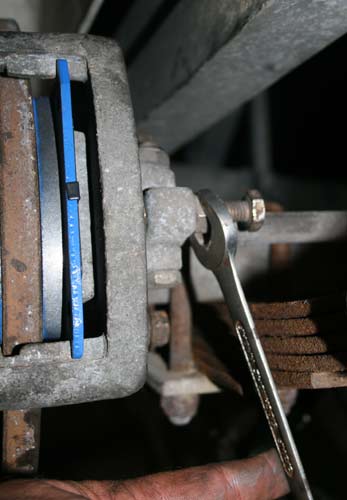
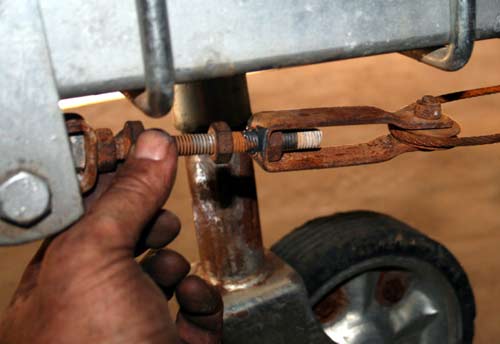
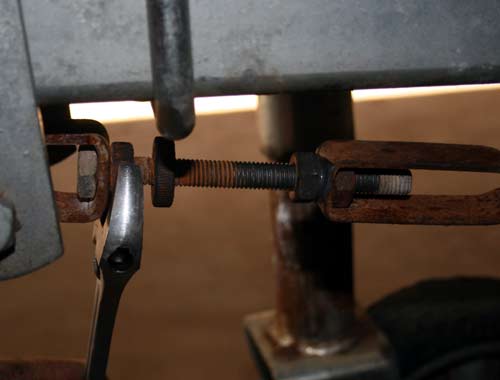
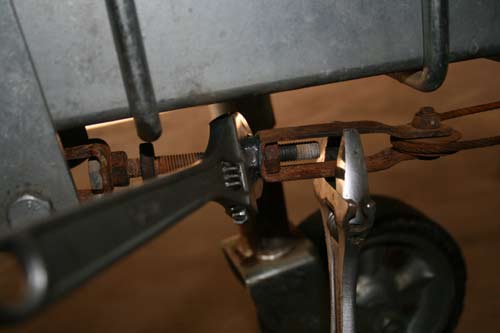
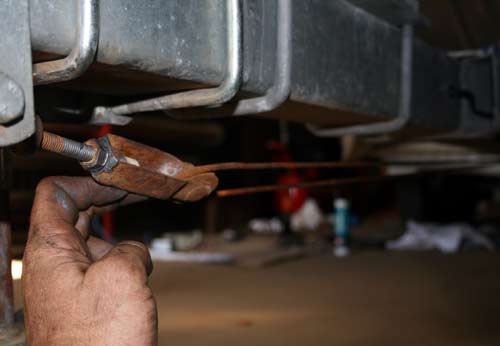
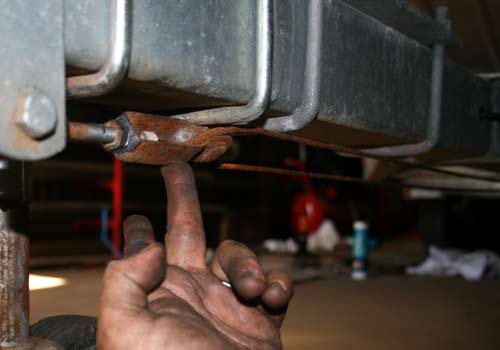
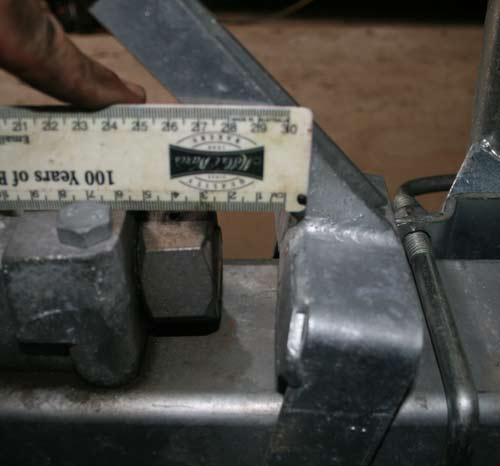
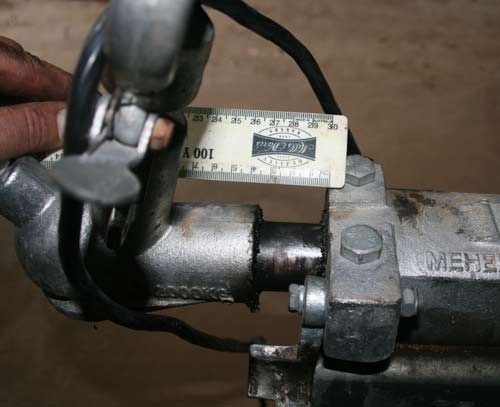
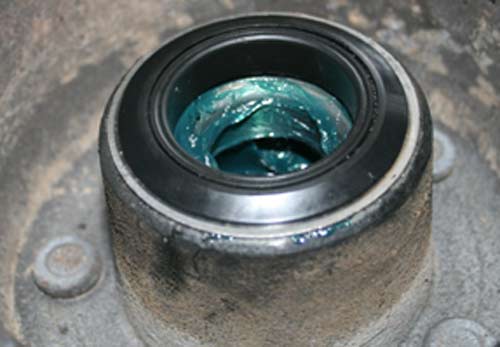
Next is to replace the grease cap. There are a multitude of different grease cap configurations out there, so if yours differs from what I'm showing here you may need to speak to someone else to get the low down on yours if it proves to be tricky. Mine is a knock in type with a spring, seal arrangement (Rubber disc & 1 O'Ring) grease nipple & plate and one circlip. Remove the circlip (Once you have the pliers engaged, place your free hand over the assembly to prevent the circlip flying off into outer space if it slips from the pliers) Pull the spring out & the seal / disc. The seals are in two pieces on mine, make sure you remember which way they came out. Give the whole thing a good clean & inspect the seals. Replace them if required & also the spring & circlip if they are affected by rust. Reassemble the unit & pop it back onto the wheel hub. Giving it nice gentle taps insert the cap back into the hub. Keep it as straight as possible. Clean off any muck & pump some grease into it. Once you see the disc being forced outwards thats enough grease. Now you can replace the rubber or plastic cover cap & tape it up. TIP – Apply the tape in the opposite direction to the forward rotation of the tyre. This will help keep it in place rather than the wind getting under the end of the tape & unravelling it on you. Right, the new pads can now be fitted. Put the push plate back in. Holding the calliper up so that the lever arm allows the push pad to be fitted flush inside the hole. Then fit the new pad in reverse of taking them out. Now, this next bit is kinda tricky, watch your fingers as you do this, blood on the brake discs isn't good for them. Before you start, clean the calliper bolt threads with a wire brush & apply some anti-seize. This stuff is available at most hardware stores, grease is nowhere near as good. Its also a good idea to put some on the bolt sleeve / spacer. The trick with anti-seize is to apply it with the brush the wipe the excess off with a rag. Too much is just plain messy & it does sometimes cause a hydraulic locking action in the bolt hole, making things difficult. NOTE – if you value your marriage take care NOT to get this stuff everywhere, it really does get onto everything. As an example. Once on a remote construction site we were told that anti-seize was banned from site (Dunno why, they just didn't want to use it) so all bolts went in dry. We snuck a bottle into camp & did a little test / bet. We put one dob of anti-seize on a handrail on the site (About the size of a 50 cent peice) and then put the bottle in the first vehicle leaving camp. After 3 days there were smudges of silver in the wet & dry messes, in the showers & toilets of the camp and the silver team (Betting group) scored $10 for each mark we found away from the site. I think we ended up with about $140. Keeping the pads apart, slip the calliper assembly over the disc. Start at the bottom & get the disc between the pads. Once you have it started it should slide on fairly easy. Just keep checking that the push pad is in its right place as you go. Now, before you go anywhere, double check that the brake arm lever & cables are in the right position & not tangled around anything. Unless there is some damage to the cable it doesn't need to come off during disassembly. Now, by rotating the calliper around the disc slightly, you can fit the spacers / sleeves to the calliper bolt holes, then add the bolts. Some callipers may require you to fit these BEFORE you fit the calliper to the disc or you can't get them in. If that's the case you need to make sure the bolts are inside the holes only enough to allow the calliper to be fitted & not foul on the disc. Tighten the bolts & give everything a good shake. The calliper should have movement when the bolts are tight. That's normal. Give the disc a spin & ensure things are free. Remember the bearings are still tight, so this will hold things a little, as long as the pads are not locked to the disc your all good. Now fit the return spring to the arm. This can be a difficult job in confined quarters, if its at all possible fit the spring before you fit the calliper to the disc, but I have found most cases this isn't possible because the spring just keeps falling out. Adjust the brake arm lever until the arm only has about 5 to 10mm gap. If there is no gap the brakes will be permanently on & your lovely new discs will be dust in no time. OK, replace the wheel, give it a spin & your done, all that remains is brake adjustment. Drop the trailer off the jack & give each brake lever & wiggle to ensure they have movement. Now tighten the cable at the front adjuster until the cable has only a slight sag in it along its full length. Test it by pulling on the hand brake. It should pull up firm well before the hand brake lever is at full stroke. It should also fall slightly slack again on release of the hand brake. Handbrake movement should only be about 10-15mm max. Double check the adjustment by measuring the gap between the inertia pin at the front (Tow hitch end) and the gap between the handbrake & the inertia pin end. The gap at the front should be more than the gap between the handbrake o0r the brakes won't apply when the pin is pushed backwards by inertia. As you can see, mine needs a little more tension on the cable as the handbrake gap is too much. That's better. Now you can grab your man balls in one hand & grunt. (Clean you hands first, a big greasy paw mark on your crutch make start some rumours in your neighbourhood) Take the trailer for a quick test spin round the block. Check the brakes at low speed. A good way to test that they come on is to reverse a little without the reversing plate on the inertia pin being flipped over. The brakes should come on & your all sweet. Now, take a drive at low speeds (under 60klms) for a few blocks, then return & quickly check the temperature of the wheel hubs with your hand. There will be some heat there but it should not be so much that you can't keep your hand on the hub. If you touch it & immediatley have to remove your hand (Unless your a real girl, in which case congratulations on getting this far at all!!!) then the temperature is over 80 degrees. Whilst that may be normal for a hot summers day after a 1000 klm trip, its not for your little test drive. If its really hot or god forbid, smoke is coming off the assembly, you need to back the lock nut off. If it continues to get hot then you'd best strip it all back & start again. Hopfully it all went smoothly & your ready to brag to the missus that you won't be able to do the ironing from now on as you have man things to do. Good luck & tight lines (Fishing lines, not brake lines!)
-
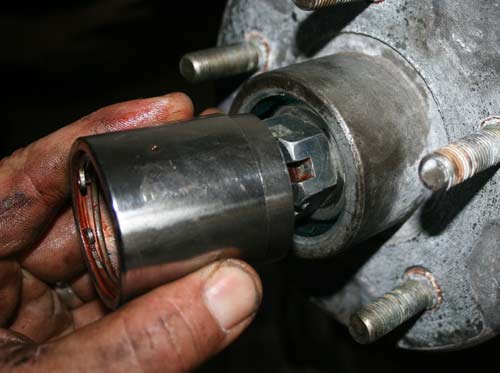
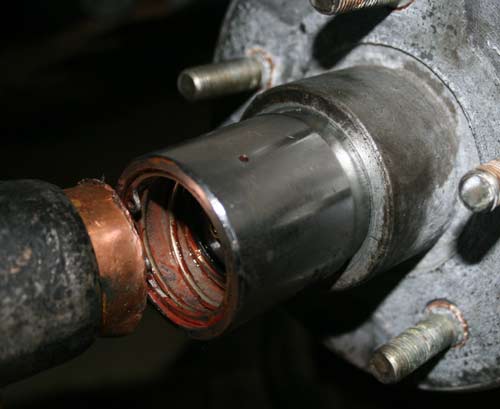
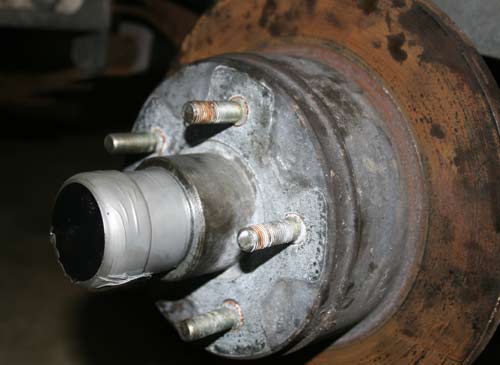
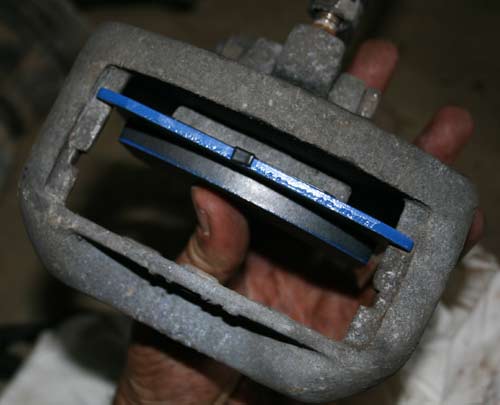
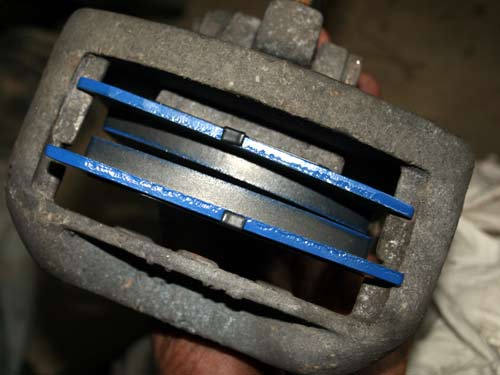
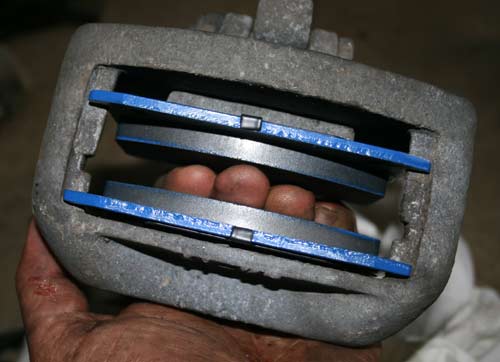
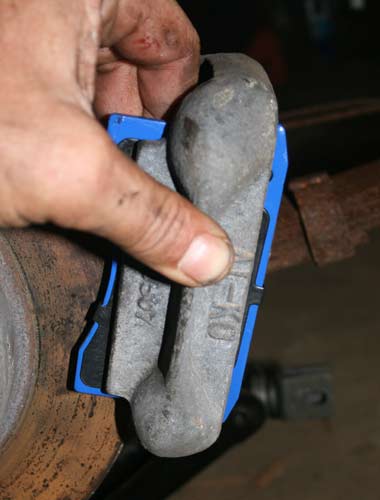
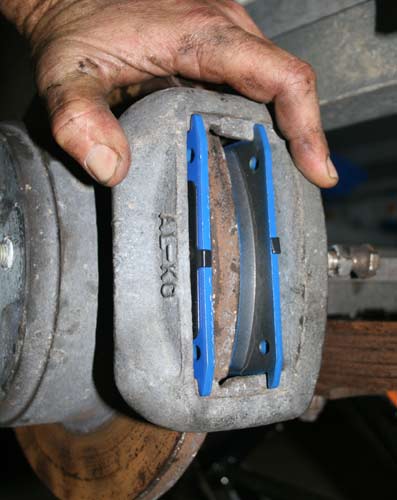
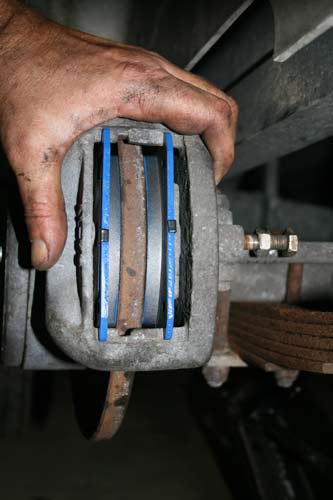
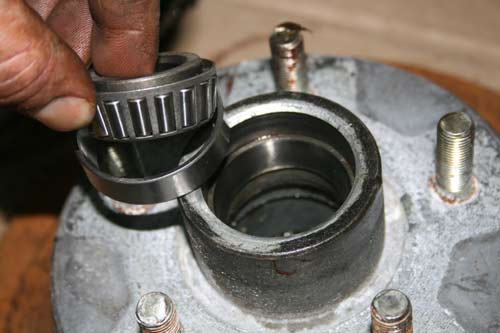
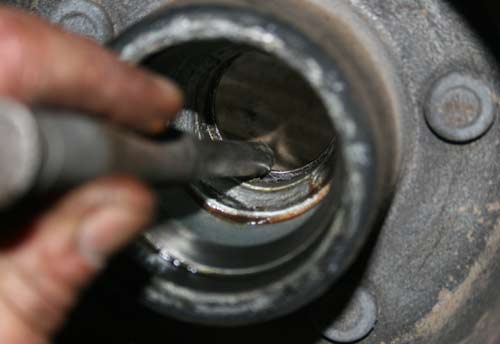
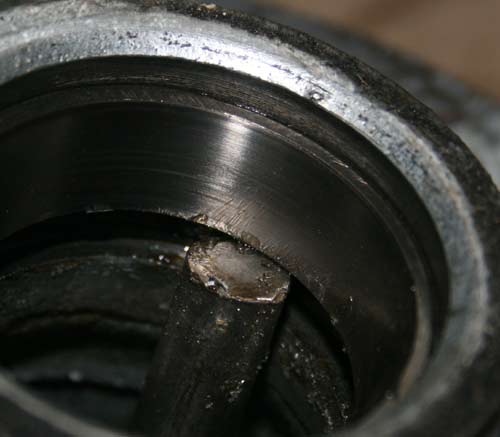
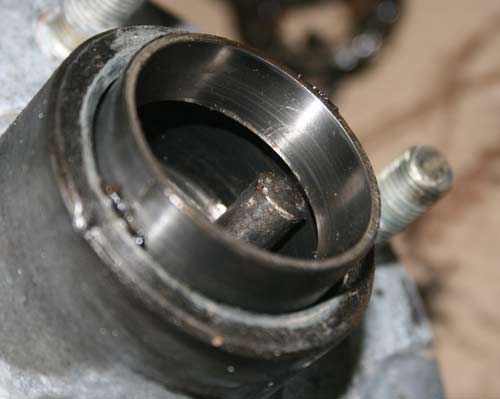
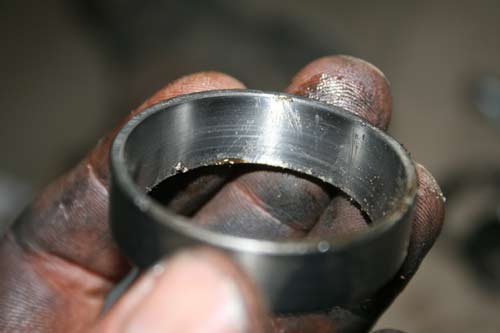
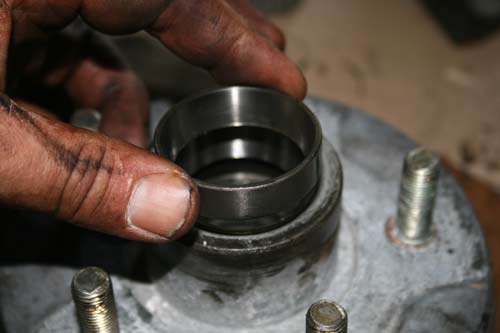
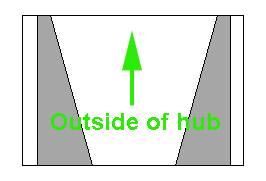
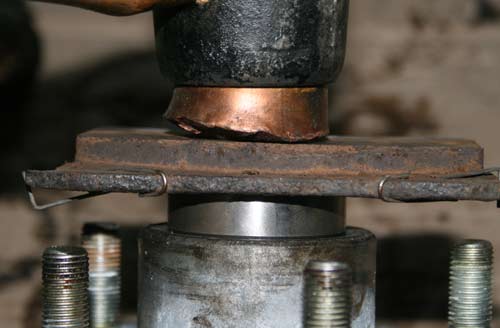
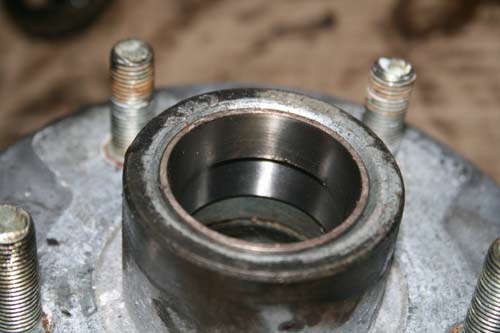
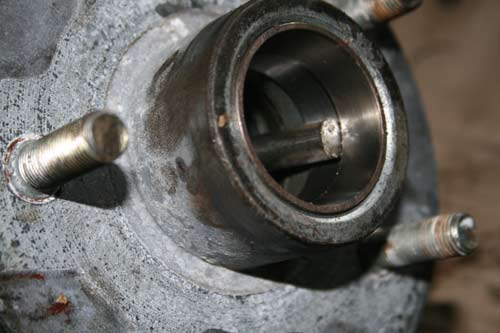
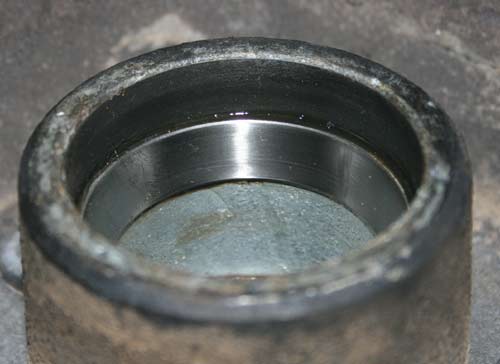
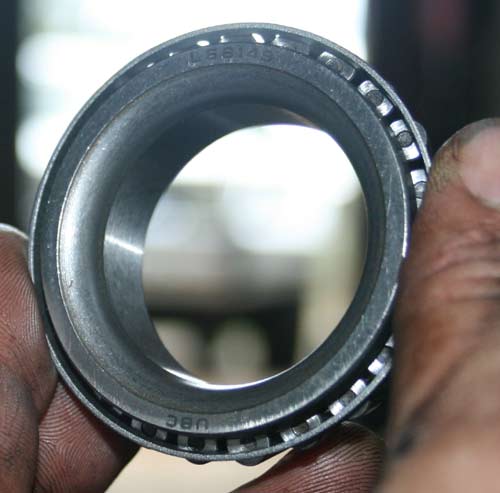
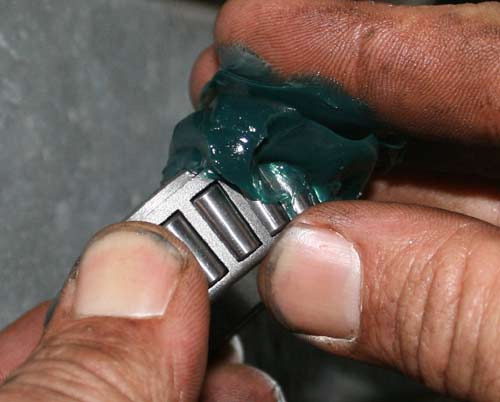
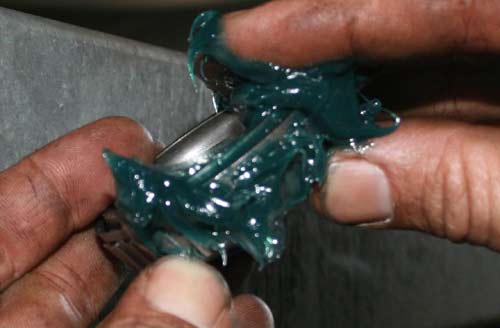
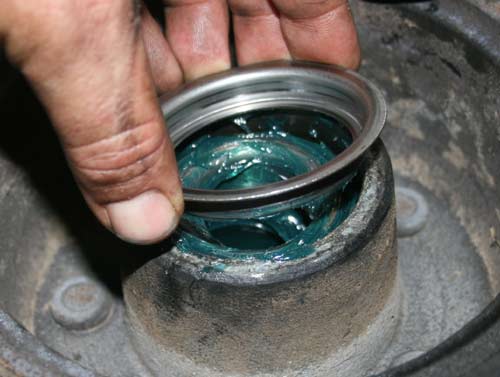
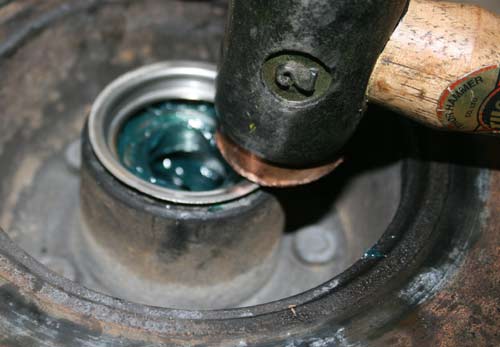
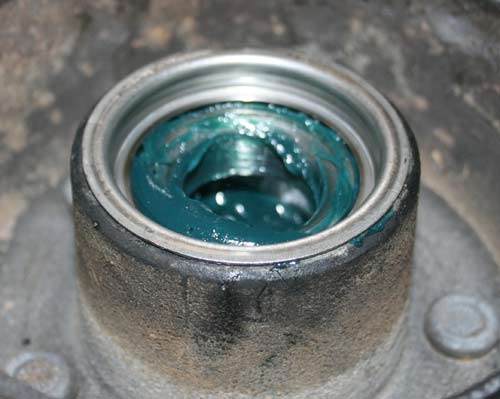
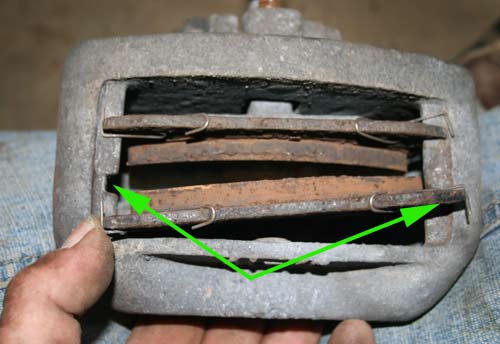
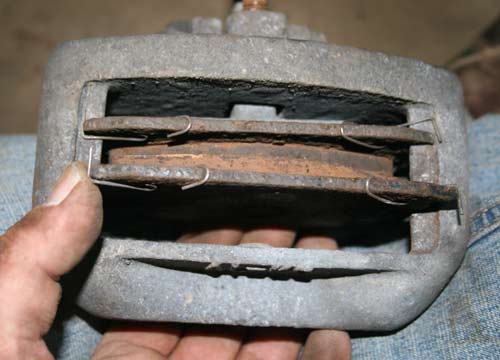
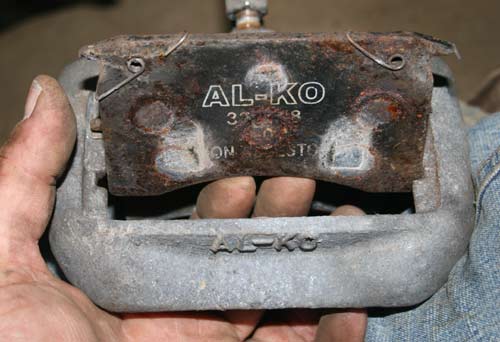
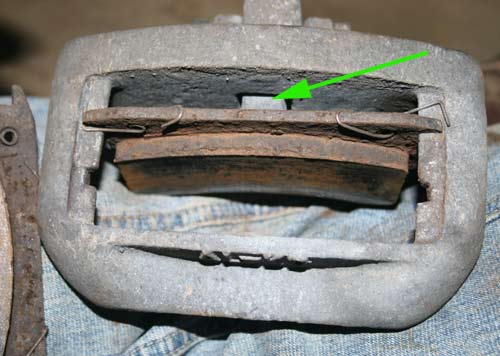
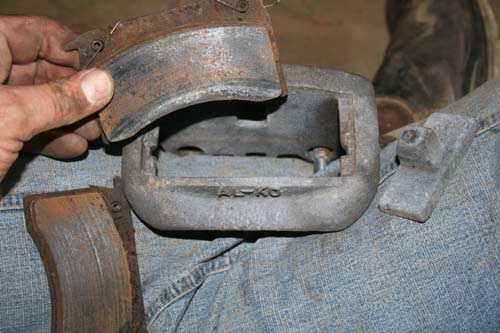
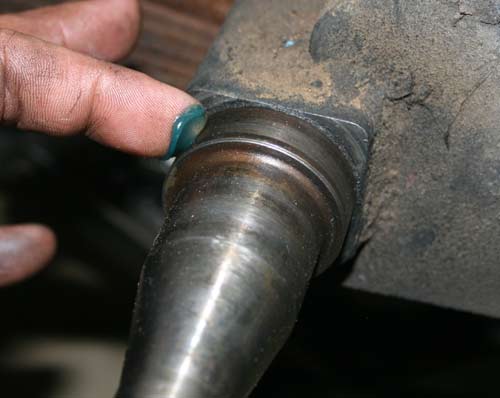
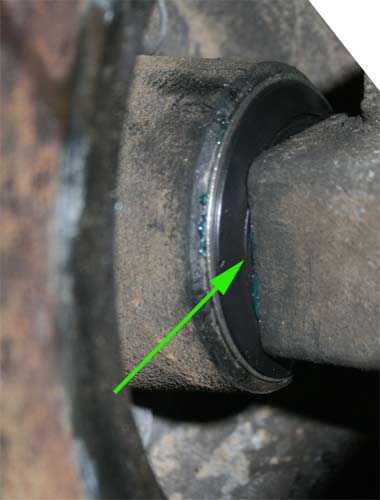
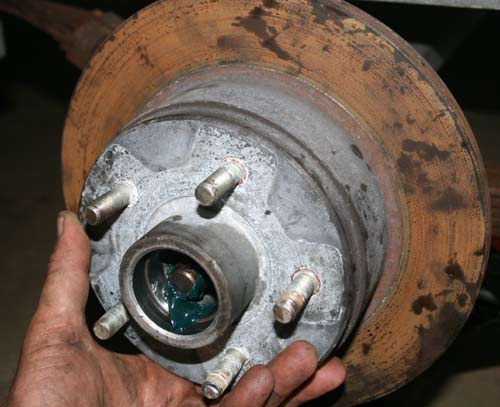
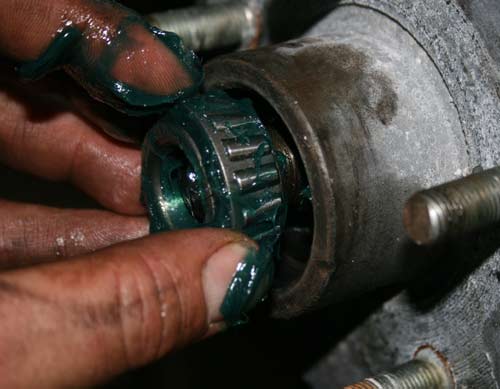
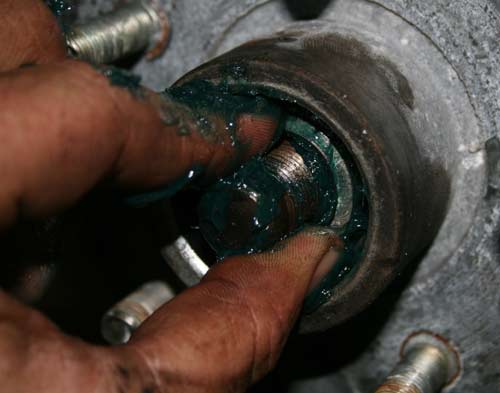
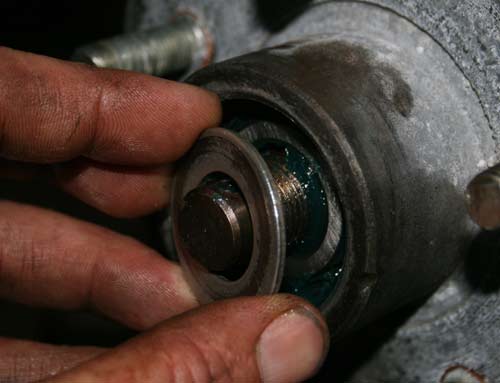
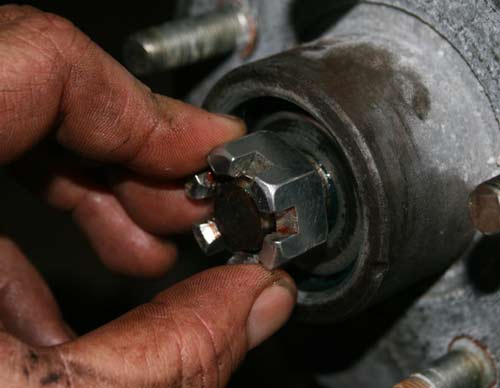
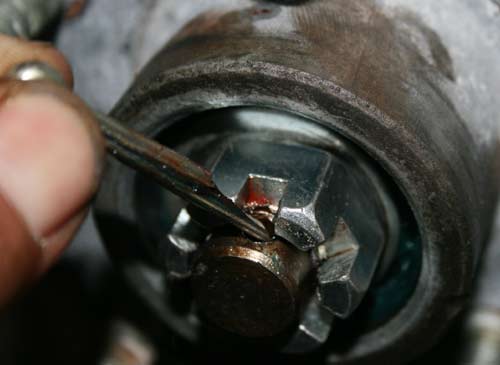
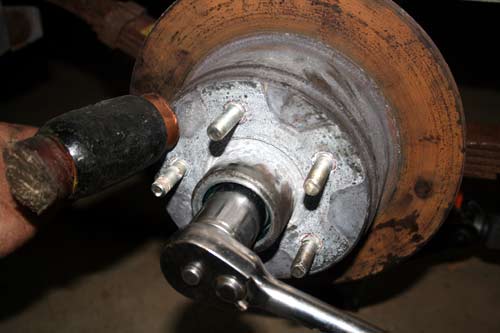
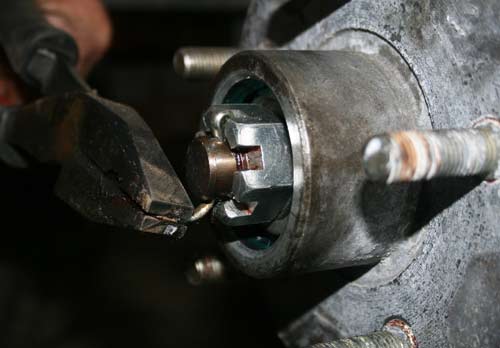
Ok, continuing from part 1 Removing the bearing tapered sleeve. Get the pin punch on the very small step of the bottom edge of the sleeve. You can just see it in the pic. Tap the punch with a hammer alternating from top to bottom or side to side at 180 degree. Don't let the sleeve kick too much to one side or it will jam in the bore & cause scuff marks & damage to the bore, making fitting of a new sleeve difficult. Just work away at it & it will come. Repeat the process at the other end to get the smaller outside sleeve out. Now, after doing a thorough cleaning job on all the components with a suitable degreaser, you're ready to reinstall the new sleeves & bearings. Keeping the sleeve square & up the correct way (The taper of the sleeve should be tapering outwards, or in other words, the thickest edge of the sleeve will be on the inside of the hub for both bearings) If you put it in back to front you won't have any step edge to put the pin punch against to try and get it out, then you might as well call my granny to give you a hand. In the diagram the grey shade represents the bearing tapered sleeve. Keep it square to the bore & gently tap it with the soft face hammer to get it started in the bore. Remember, this part above all else if extremely brittle & it will crack, snap or explode if you hit it on an angle to hard. Square blows with the hammer alternating around it to keep it square to the bore as it goes in. A good way to ensure things are square is to use a plate or in this case, the old brake pad to knock it in till its flush. You will notice that the sleeve isn't all the way down inside the bore yet. I bet you threw the old sleeve in the bin didn't you! Go and get it speedy, you're gonna want to use it to knock the new sleeve all the way down to the shoulder at the bottom of the bore. Sit the old sleeve on top of the new one facing the SAME way, IE Thick edge to the new sleeve & repeat the brake pad exercise until everything comes up solid. Now, the new sleeve is at the bottom & the old sleeve is in the bore on top of it. Repeat the process you used to removed the original old sleeve only this time just remove the old sleeve & leave the new on in place. Take care not to strike the new sleeve with the pin punch. Time for the gooey stuff. Pack the bearing with grease, trying to force the grease into the gap between each roller from the ends is the most effective way if you don't have a grease packer handy. Roll the bearing around a bit to spread the grease around inside. Apply some grease to the hub where the tapered sleeve is. About half full is good, don't go overboard with it. As the bearings wear in from new there will be a fair amount of heat (There is normally anyway during travel) The heat will expand the grease and if things are stuffed full in there you could blow the seals out. Time for the seal retaining / backing ring. (Steel ring) Gently tap this in all the way so the outer ring edge is flush on top of the hub. Now pop the new seal in & your in business. Repeat these steps for the outside (Smaller bearing) except for the seal, its a different setup for that one. Now to remove the old brake pads. Looking at the top of the calliper there are two cut outs in the housing, slide the outside pad to the cut outs & pull it upwards. Some callipers may have a different retaining method, but they should all be pretty easy to remove. There mat be springs to hold them in also. The springs on mine are not really required (New pads don't come with them anyway) The design of the pad (Shape) is what hold the pad in. The springs may help a little with pad rattle & thats about it. I didn't refit the springs in my setup. Once the first pad is out the second one comes out the same way. The inside pad should have a push plate also, which will probably fall out. Just try to ensure you note how it was sitting in the hole so you can put it back the same way with the new pads. There is a difference. Replacing the hub is straightforward. Two things to take care with. Firstly, apply some grease to the axle shaft where the seal rides, this will help the seal slide on & hopefully stop any chance of it grabbing & damaging the seal. Once everything is one, BEFORE you tighten the nut, double check from the inside that the seal is right up against the shoulder of the axle & that it looks ok. If anything is misaligned here you will have buggered bearings after the first boat outing. Now, you can leave the outside bearing until you have the hub fitted. Line up the hub & gently slide it onto the shaft. Take care & don't force it, you may damage the seal. Once its hard up against the shoulder you can push in the outside bearing. Push the flat washer on now & then screw the nut on loosely. Give the hub a firm shake to ensure everything is in position. Tighten the nut with your fingers. Keep rotating the disc now & then to centre everything & ensure the hub is right back. Now you can tighten the nut. Do the nut up firmly. Check that the disc still rotates freely & as the tension on the nut increases the hub will start to become firmer to rotate. If there are any horrible scraping sounds when you rotate the hub STOP, something is amiss & you should remove the hub to check things before any damage is done. Now, several people have there own opinions on how you should tension the wheel bearings, here's mine. I like to do it up tight enough that the hub is hard to rotate but does still move alittle. Don't get all McGilla Gorrilla on it, just nice even pressure on the socket to apply the tension. At this point I give the hub assembly a little love tap to make sure things are seated. Don't smack it like you would Bin Ladens Head, just tap it on the edge like in the picture as you turn the socket. Tthe hub should still be tight to rotate but moving with some persuasion, now back the nut off about 1/8 of a turn to align the split pin hole up with the slots in the nut. Doing this should free the hub rotation up slightly but you don't want it so loose that it spins freely. If you grab it & try to spin it by flicking your hand, the hub should stop dead when your hand comes off. Trust me, the bearings will seat on first use & things should free up nicely until your ready to check & retension them after about 20-50 kilometres. As a side note, when the wheel & tyre are refitted, if you do the same spin excersise the added weight of the tyre should allow the wheel to actually spin. If you do this & it stops dead things are too tight & the nut should be backed off to the next split pin hole slot. Fit the split pin & bend it over fully on one side. You don't need to bend both legs of the pin unless they are so long that they foul on the grease cap. If they do foul, rather than bending both legs, trim the straight leg with a pair of side cutters. It makes getting it out again when the time comes much easier. Continued in Part 3..............